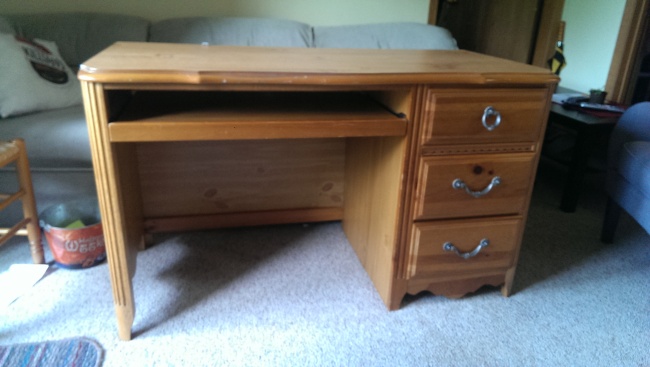
After seeing an episode of HGTV’s Flea Market Flip, I decided one way to get nice furniture for cheap is to do your own remodel of a piece. I immediately scoured craigslist and got this $40 desk and chair combo.
I really liked the detail of both pieces. They were ornate and attractive, but I had to make sure to pick a more masculine color combo to ground the curvy look.
Fortunately refinishing furniture with paint is much more forgiving than re-staining, at least for the sanding step. Just scuff all the surfaces enough to remove the glossy finish; otherwise the paint won’t stick.
I was eager to see what the painted surface would look like, so I couldn’t help but with the most visible sides. However, once that coat dries, don’t forget to flip the piece over/around to spray the easy-to-miss surfaces.
Since grey was my accent color, I chose to match the chair to the desk hardware. I wasn’t a fan of the outdated faux-bronze anyway.
It was about to rain, so I only had time to spray the fronts of the drawers in my main color before my day was cut short.
The next day was desk day. The first thing I did was to remove the keyboard tray and kock out the fake back panel. Keyboard trays might be nice for hiding away mouse and keyboard when you’re not using them, sure, but they don’t look attractive. Both it and the fake back panel were add-ons that did not fit the classic old look this desk was obviously striving for. I did leave the tracks for the tray on the inner desk sides, so it’s always an option to add back later.
In addition to sanding down the previous finish, I sanded out scratches and dings as best I could. for the deeper gashes, you can purchase plaster spackling. Just apply it into the gash, smooth over the surface, and sand it even with the wood when you’re done. The brand I used goes on pink and dries white. If you’ve sanded it well, you’ll never be able to tell there was a gash once you paint over it. This is just another advantage of painting old wood rather than staining it. Here, I re-sculpted corners that had likely been taken out by chair bumping.
From there out, it was just a lot of spray painting.
Remember when spray painting anything, spray in even passes over the surface, squeezing the nozzle once for each pass. Start and end the squeeze off of the surface so that you don’t get any abrupt marks. Do not hold the nozzle down continuously and zigzag all over the surface. That will only lead to thin areas and pools.
I let the first coat dry and applied a second to catch any thin spots where the old wood grain shows through. This is especially obvious with a dark color like my navy blue. Once I was satisfied and dried, I brushed on a coat of polyeurethane finish. This does two things; gives it a professional-looking finish and protects the paint from scratches and spills. I used an old brush that may have been too stiff to make the finish smooth and left brush marks. However, I made use of the marks by carefully continuing them in a way that gave the desk that wood-grain texture back. It’s a stylistic choice. If I want a finish as smooth as the spray paint beneath it, I could always sand the finish with very fine sand paper and apply a second coat with a fresher brush or even a spray clear coat. I only suggest the brush-on polyeurethane over spray clear coat because it gives thicker, more permanent protection.
As an added bonus, I used my extra spray paint on two beer buckets that used to have unattractive Bud Light ads plastered across them. I just taped over the parts I wanted to stay metallic, and bam: beer buckets to trendy trash cans that match the room!
All in all, $40 on the desk and chair, $22 on the paint and finish. $62 total to transform a craigslist find into a set that would easily cost hundreds from brand stores.


